In the other two blogs related to this post series are here:
- Embracing the Cloud for Analytics – Part 1 – Creating an SAP Cloud Platform trial account and creating our first HANA database in the cloud
- Embracing the Cloud for Analytics – Part 3 – Creating an SAP Analytics for Cloud trial account and creating your first story
So now that you’ve got an SAP Cloud Platform account, we want to start uploading some data to it.
Although the SAP Cloud Platform provides a good web interface for connecting working with data in the cloud, my personal preference is to use the Eclipse IDE. In this blog I want to show you how easy it is to set up the eclipse client so that you can access your HANA database in the cloud and start loading some data.
Installing Java and Eclipse for SAP Cloud Platform
I found that this handy video from Dan Grissom which walks through the configuration process for downloading and installing Eclipse on Windows 10. It will automatically give us the latest versions of all the software.
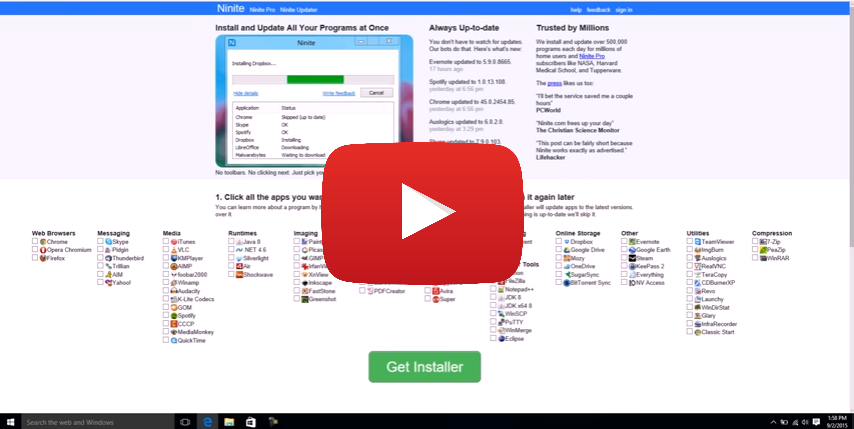 It uses a website called Ninite which creates a custom installer for the products you wish to install. This video will show you how to:
- Download and install the required Java JDK components.
- Download and install Eclipse.
If you would rather install the components manually, I recommend you follow this step by step tutorial within the SCN. (Below I will pick up step 8 of the tutorial)
Here is a handy wiki page if you have challenges during the installation.
So now that we’ve got the Java and Eclipse components installed, let’s continue.
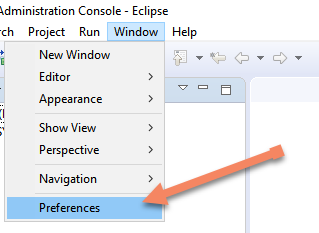
Configuring Proxy Settings in Eclipse
If you are running within a corporate environment, you may also need to configure proxy settings for Eclipse. You can change your proxy settings by accessing Windows > Preferences.
This will open up the following Preferences Screen.. Under General > Network Connections you will find these settings. You can also find it by typing “Network” into the filter/search bar.
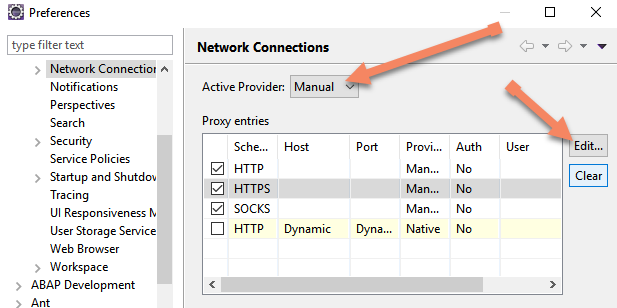
Configure Your Manual Connection for your Corporate Proxy
Under Active Provider choose Manual. Next select the first Schema HTTP and choose edit. Add in the name of the host and port in the space provided. Because I work at SAP, my settings are proxy 8080.
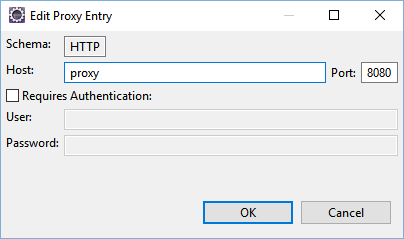
Set your Proxy Entries to connect through a corporate firewall
Choose okay and do the same process for HTTPS.
Once complete your settings should look something like this:
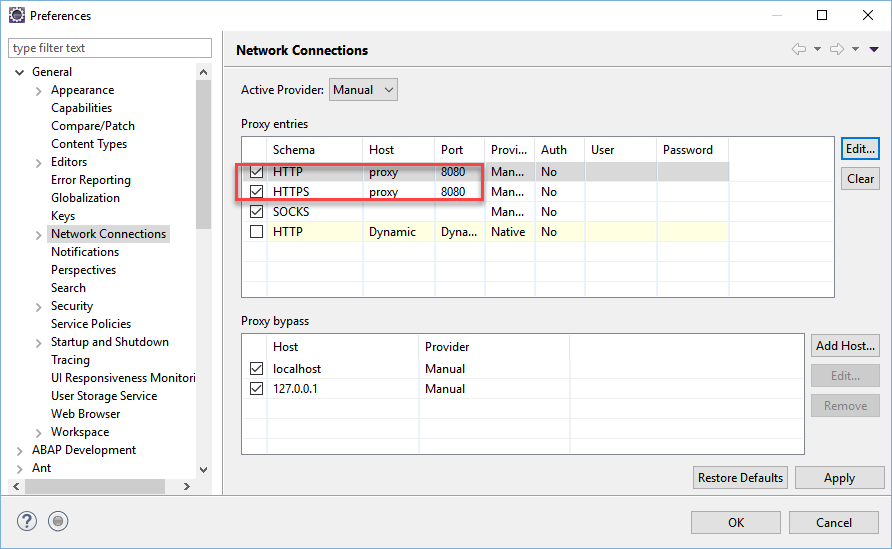
Confirm your settings for Manual
Once the proxy is configured you can switch back and forth between Manual (I’m in the office and need proxy) and Direct (I’m outside my proxy environment). Now we are ready to install the SAP Cloud platform tools into Eclipse.
Installing the SAP Cloud Platform tools for Java
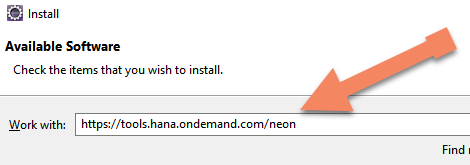
Choose Install New Software:

Help > Install New Software
and copy the following URL
https://tools.hana.ondemand.com/neon
into the software list.
Pull the SAP Cloud Components directly from SAP
From here you can choose to install as much software as you want but we only need the SAP HANA Cloud Platform Tools, so select this option and choose Next.
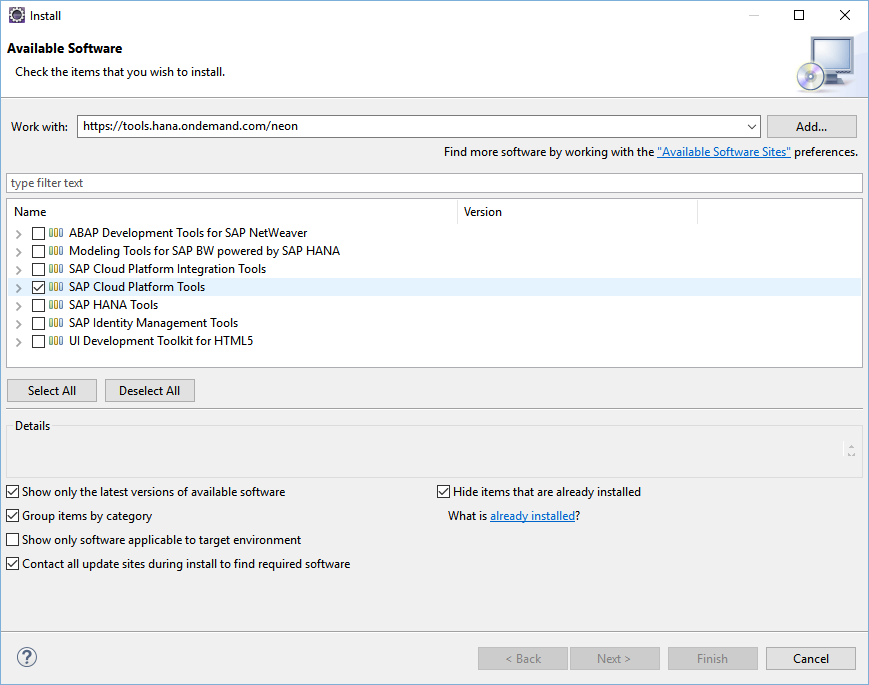
Select SAP Cloud Platform Tools
After accepting the license agreement, Eclipse will ask you to restart. We’re almost done.
Download and install the SAP Cloud Platform SDK
Next, we need to download the install the SAP Cloud Platform SDK. This can be downloaded directly from the SAP Cloud Platform Tools site:
https://tools.hana.ondemand.com/#cloud
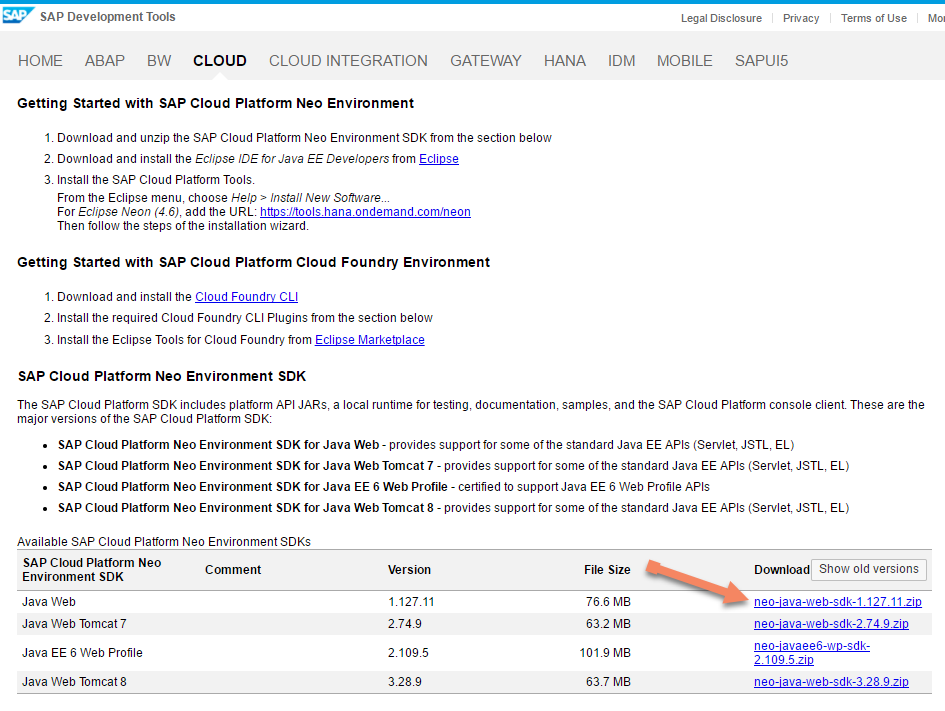
SAP Cloud Platform SDK
The SDK comes in different flavors:
- Java Web: Provides a lightweight runtime supporting a subset of the standard Java EE APIs (Servlet, JSP, JSTL, EL). Currently there is a
1.xversion of this runtime available - Java EE 6 Web Profile: Provides certified support for the whole Java EE 6 Web Profile APIs. Currently there is a
2.xversion of this runtime available - Java Web Tomcat 7: Provides support for some of the standard Java EE APIs (Servlet, JSTL, EL). Currently there is a
2.xversion of this runtime available - Java Web Tomcat 8: Provides support for some of the standard Java EE APIs (Servlet, JSTL, EL). Currently there is a
3.xversion of this runtime available
For our exercise we will select and download Java Web.
After it has been downloaded, place it into the appropriate directory. In my case I created a directory called, C:\dev\ and then extract the contents of the .zip file. So my directory looks like this:
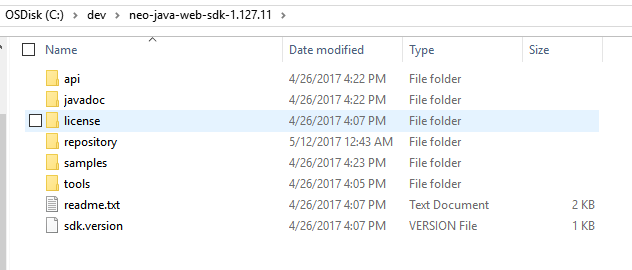
Extracted SDK
Next we will need to associate this Java Web SDK with Eclipse so the software components installed with Eclipse can access them. Choose Window > Preferences.
Edit Eclipse Preferences
Choose Server > Runtime Environment. Click the Add… button to open the New Server Runtime dialog.
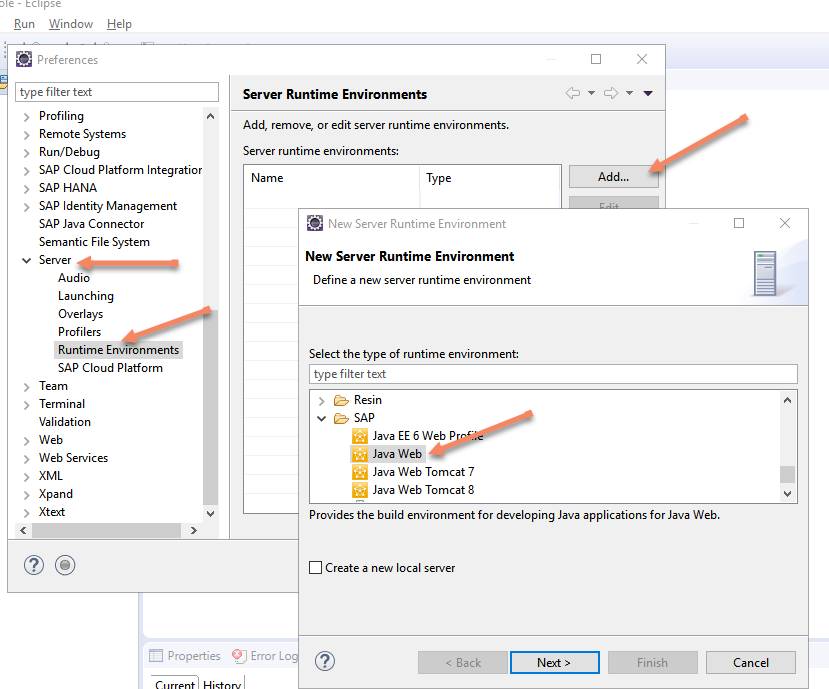
Select Java Web from the list of Environments
Scroll down and select SAP > Java Web from the list of Server Runtime Environment(s) and click Next.
Provide the folder to which you have extracted the SDK by clicking the Browse… button and choosing the respective folder, e.g. c:\dev\neo-java-web-sdk-1.127.11.
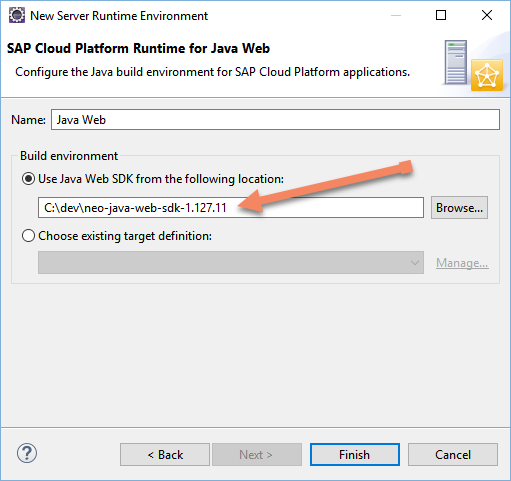
Select the SDK root directory
Click on Finish.
We have now installed the SAP Cloud Platform Tools for Java and are ready to start using Eclipse to connect to HANA within the SAP Cloud Platform.
Connecting to HANA
First, make sure your HANA instance is running in the cloud before you attempt to connect to it. In my previous blog I shared that your trial HANA account is only allow the database to run for 12 hours before it is shuts down so sometimes you may forget to restart your HANA database when going into Eclipse. To confirm your database is running, log into the SAP Cloud Platform via the web and check the database status. Before you begin this step, confirm that you SAP HANA database is running by logging into your SAP Cloud Platform and verifying the status. If necessary start the database. (Remember to refresh the screen since the screen does not refresh automatically.)
Once you have confirmed your HANA instance is running, you can continue.
First let’s switch to the HANA Administrative Console Perspective within Eclipse by choosing: Windows > Perspective > Open Perspective Other.
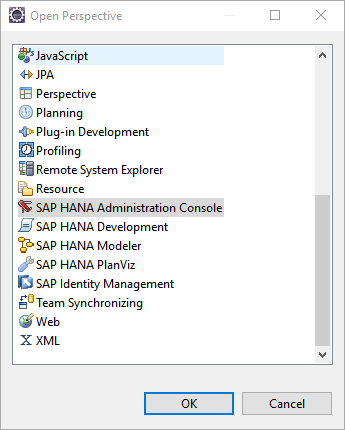
Select the Administration Perspective
From here we can add a new HANA system to our Admin Console. Choose Add Cloud System…
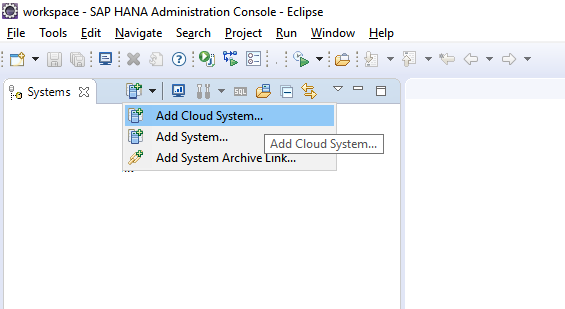
Select Add Cloud System…
From here, how we fill out this section will depend on your account.
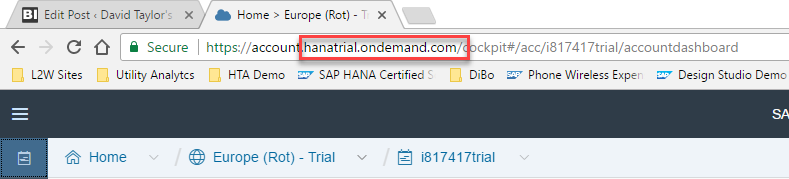
Landscape Host: This is the URL of your SAP Cloud System. To determine the user for your account, it should the root URL less the “account.” at the beginning of the URL. For example:
- Trial accounts (https://account.hanatrial.ondemand.com/) would have a host landscape of
https://hanatrial.ondemand.com/ US Ashburn data center (https://account.us1.hana.ondemand.com) would have a host landscape ofhttps://us1.hana.ondemand.com/
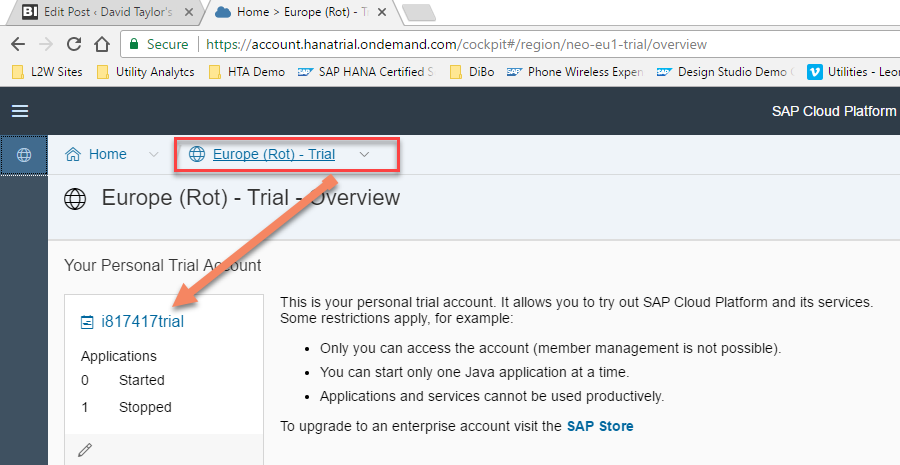
Account Name: This is the Account name associated with your username and password. You can see this by logging into your SAP Cloud Platform account and looking at the menu bar.
- Standard Trial accounts: pXXXXXXXXXX6trial, for example
p1942629386trial - SAP Employee Trial accounts: iXXXXXXtrial, for example i817400trial
Non-Trial accounts can be anything, e.g.presales
Find the Account Name
User name: This is the name you will use to access the SAP Cloud Platform. This is typically the same name as the account name but without the “trial” at the end.
- Standard Trial accounts: pXXXXXXXXXX, for example
p1942629386 - SAP Employee Trial accounts: iXXXXXX, for example i817400
Non-Trial accounts this is the name of the SubAccount. for exampleb0b8e5ce5. Always check the subaccount information to be sure as in the screenshot below:
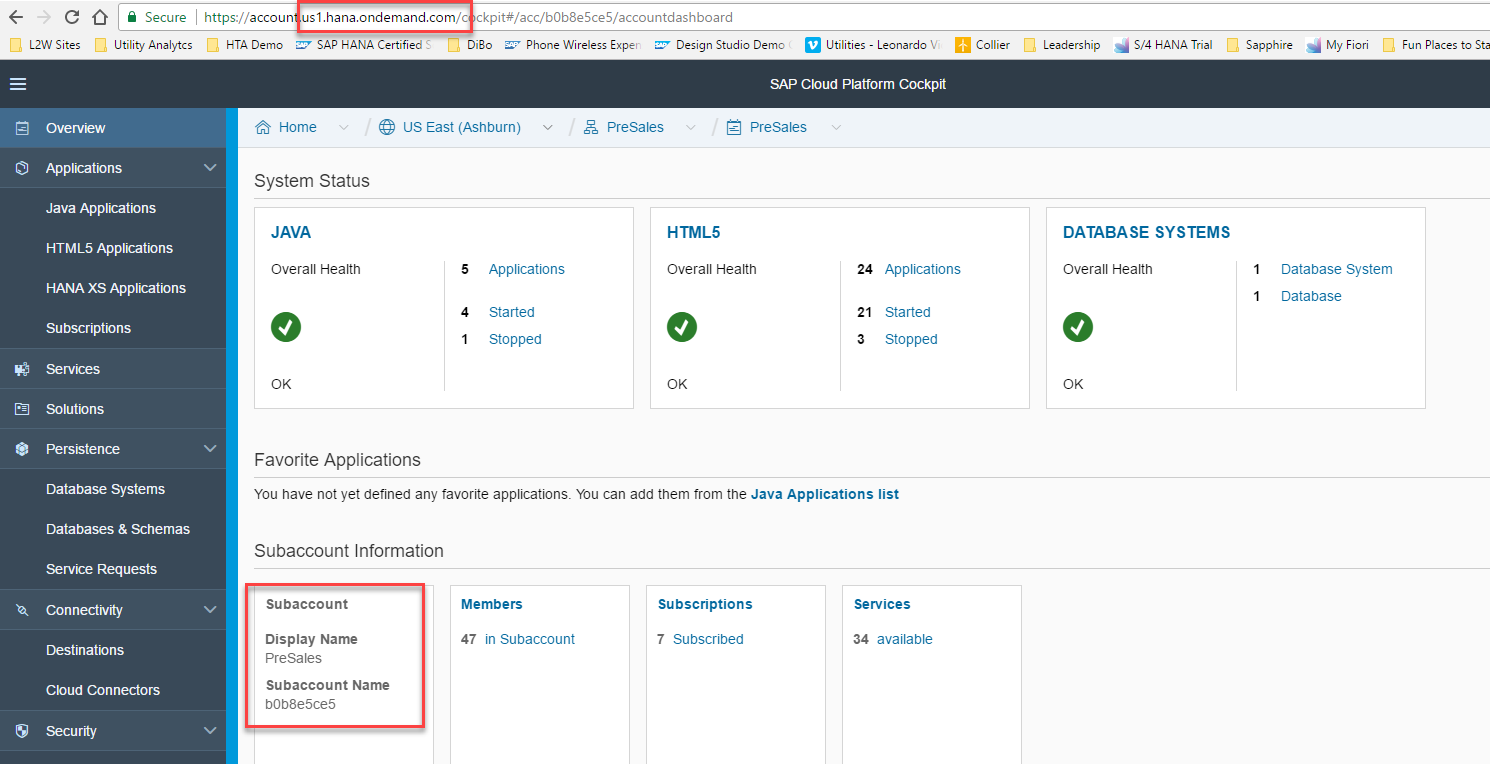
From with SAP Cloud Platform you can see these values
Password: This will be the password you use to log into the SAP Cloud Platform. If you are an SAP Employee and SSO is used to access the SAP Cloud Platform, you will use your corporate password.
Here is are two examples. This is what an SAP Employee might see:
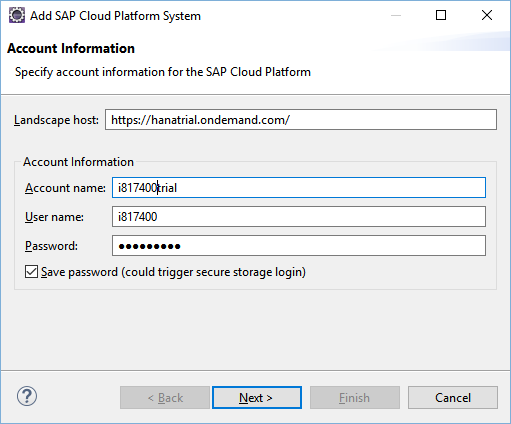
Example SAP Employee Setup
This is what other trial accounts look like:
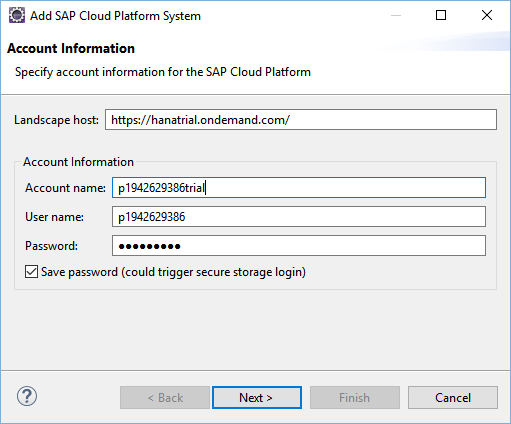
Example Standard Setup
Selecting the HANA Database
Once this information has been entered correctly, you will be prompted to select the database, username and password.
- Database: Select the correct HANA database from the drop down. In my case, my current HANA database is called demo.
- Username: This is the username for the HANA database. This will typically be SYSTEM.
- Password: The password you assigned to the HANA database user. This is typically the password for the SYSTEM user.
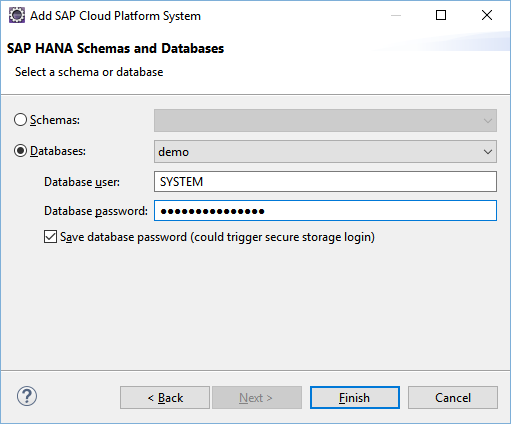
Now Enter the Database details
After your database is added, it will be added to the Systems list on the left. In my case I added three different HANA instances from three different cloud accounts to my Eclipse environment:
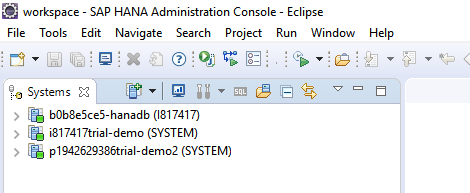
Connections to 3 different cloud HANA instances
Loading Data Into HANA
So next, let’s get some data loaded. One of the easiest ways to import data into HANA is to use a spreadsheet.
If you want to follow along using my dataset, you can access it here, Insurance Data. Otherwise feel free to use your own data set. I should warn you that the HANA data import is not the most robust data import tool depending on what data formats you are using, etc.
To start the process, choose File > Import:
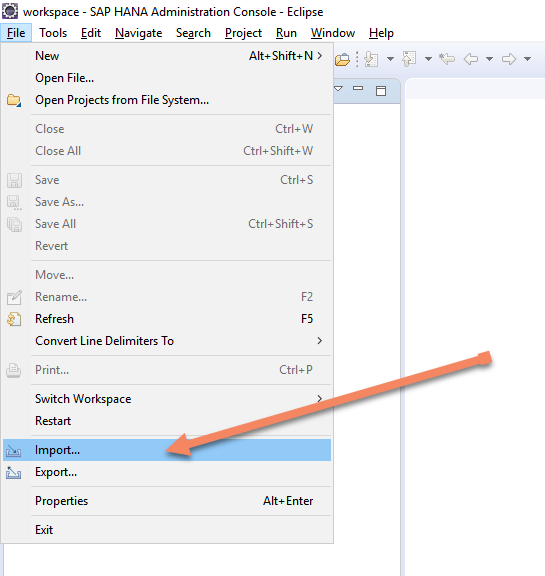
Select File > Import… from the menu
We want to import file data, so let’s choose Data from Local File from the list.
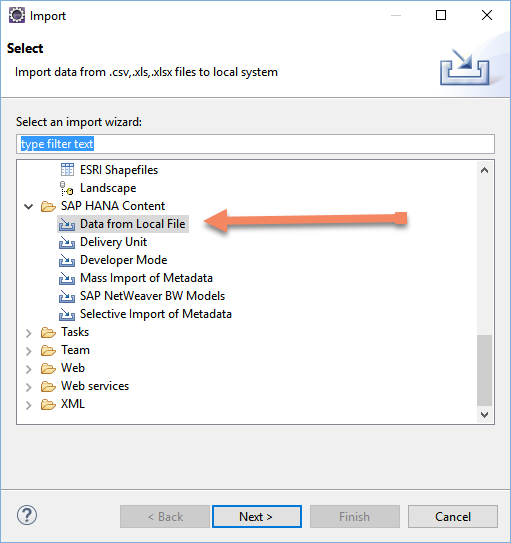
Scroll down to SAP HANA Content > Local File
Next select the name of the HANA System that you want to use to load the data:
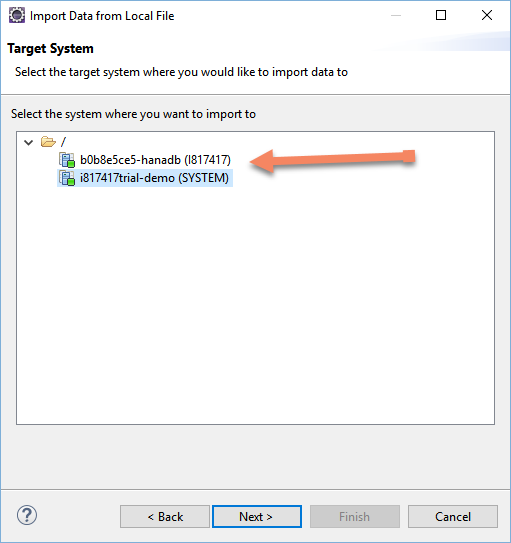
Select the Target System for the data
Choose a local Excel file and load the data and specify the target schema and table name. Here I am going to create a new table:
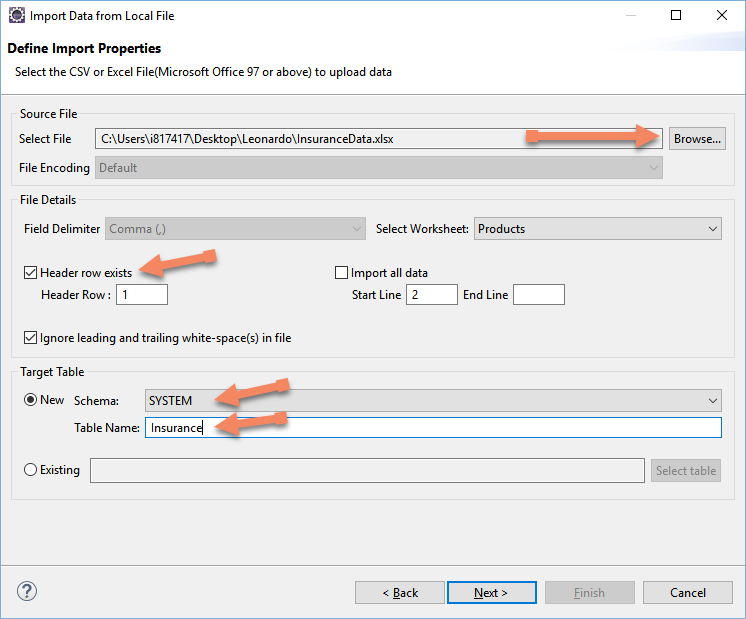
Importing the sample Insurance data
Click Next.
You may want to modify some of the data attributes since the import tool is making a best guess based on a sample of the data contained within the file. For example I rounded up the text length of most of the fields and changes all the Decimal fields to Decimal(10,2). We can adjust that here.
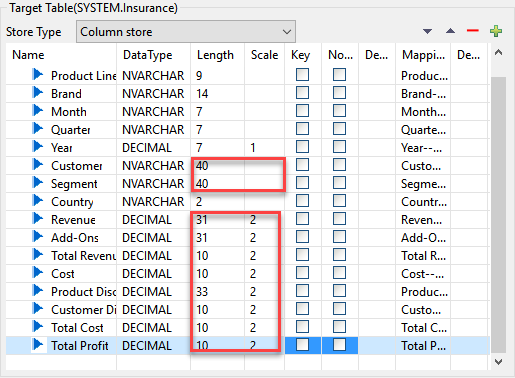
Here are some of the schema adjustments I made
Click Finish to begin importing the data. After the load is attempted refresh the view on the left so that the new database you created will appear under Catalog > (Selected Schema) > Tables. You can do this by right-clicking on the schema and selecting Refresh.
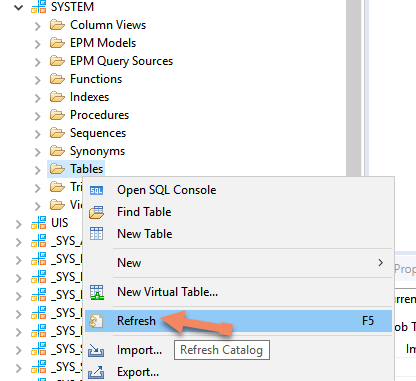
Right-click and choose Refresh
If the load was unsuccessful, then make the appropriate changes, delete the empty table and try the load again. Most commonly there was a problem with the default schema that HANA used based on the data sample. The Job Log window at the bottom of the screen will tell you whether or not the data load was successful.

Job Log provides a status
Once the load is complete, preview the data within Eclipse by right-clicking on the table and choosing Open Data Preview.
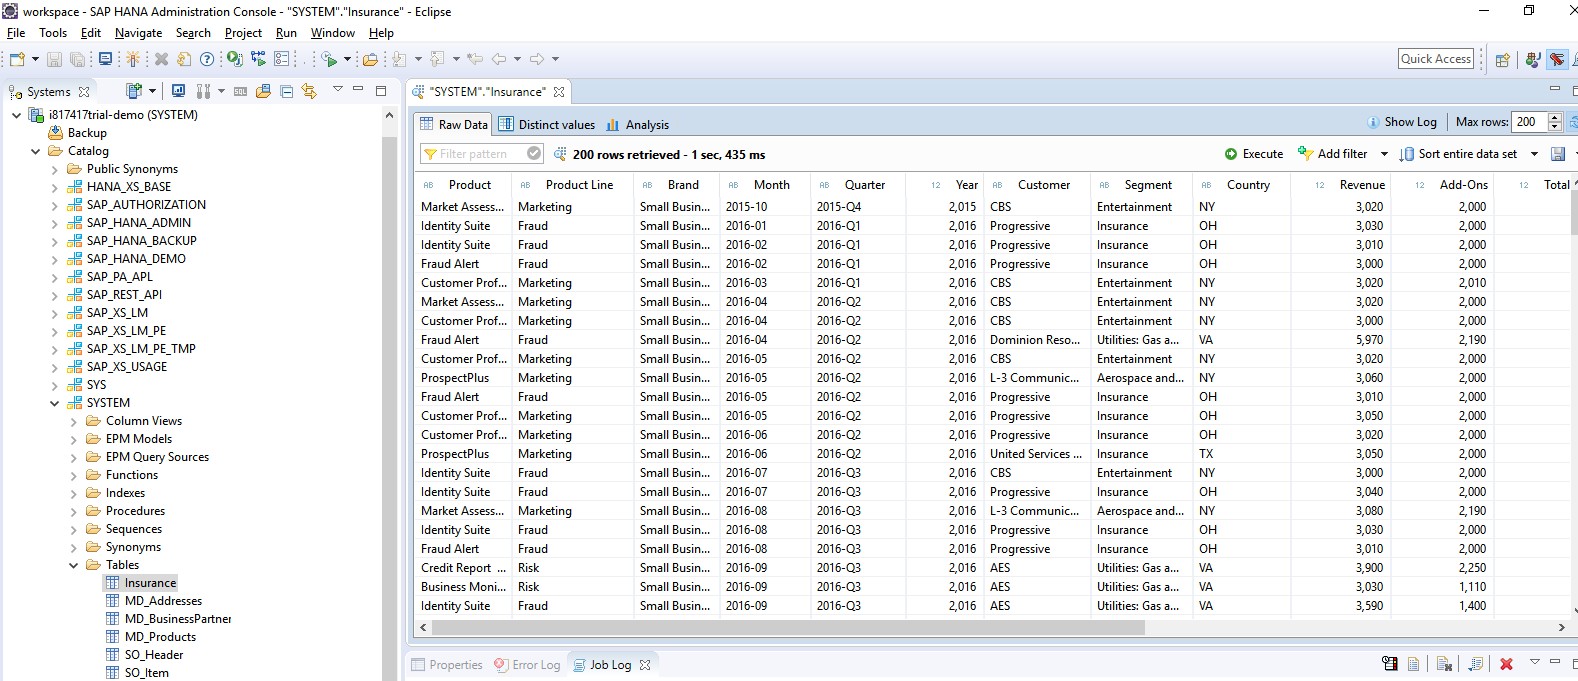
Here you can see the data you just loaded
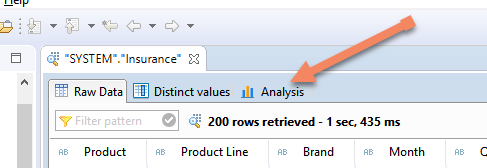
We can begin to do some initial data quality checks. Click on the Analysis table to switch to the Analysis view:
HANA allows you to analyze your data in place
Choose Analysis and drag Product into the Label Axis and Total Profit into the Values Axis.
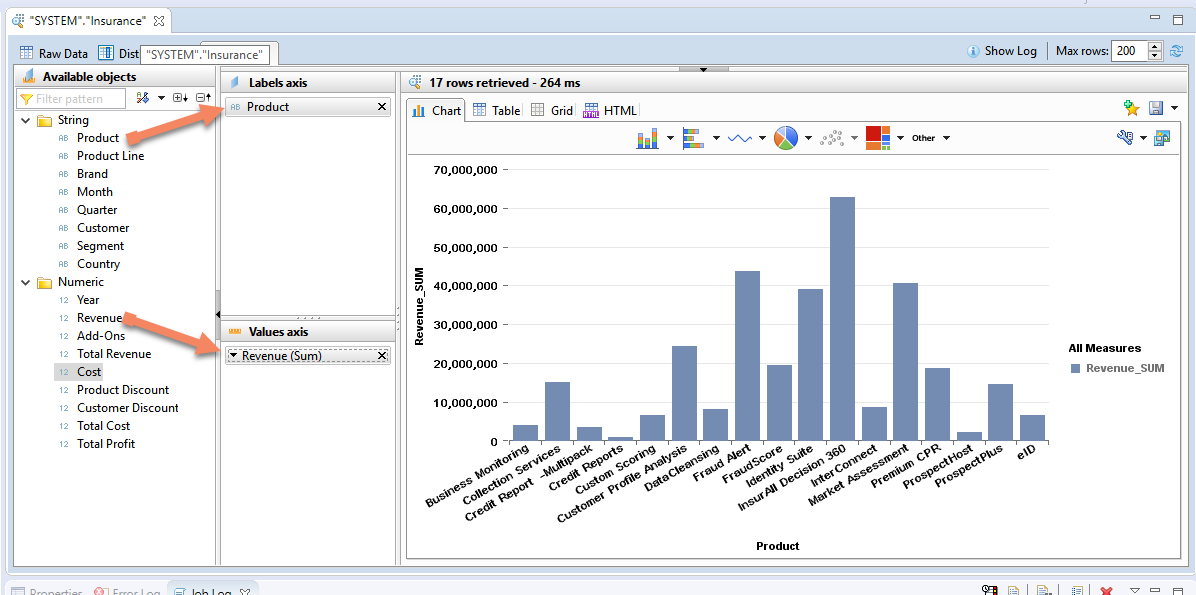
Products by Revenue
Feel free to play around with the Analysis features. They are quite robust and allow you to change chart types, add filters. Here I switched to a bubble chart and updated the view to include Customers by Customer Discount, Product Discount and Total Profit.
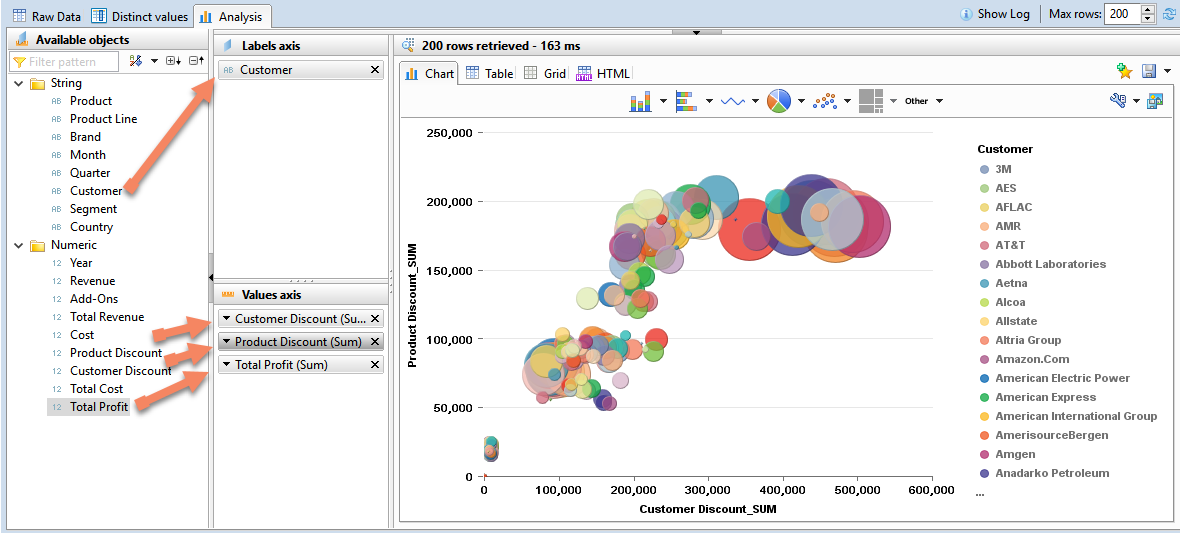
bubble chart
If you want to run some of your own SQL queries you can do that tool by right-clicking on the schema and selecting Open SQL Console from the menu option. If you have more questions about how to use SQL with HANA, there are a series of great videos available here.
Conclusion
We completed the configuration of the desktop tools which provide us an alternative to the WebIDE experience that is available by default with the SAP Cloud Platform. Eclipse is a terrific development environment for your Analytics team when it comes to managing and modelling your data within the SAP Cloud Platform.
Next we will want to connect our SAP Analytic tools to our data that resides within HANA and setup the automated ‘refresh’ of data from on-premise systems into the cloud.
«Good BI»


